Quick Start
One command sets up AutoMem and connects it to your agents:
curl -fsSL get.automem.ai | shThat launches the guided installer. It detects your machine, helps you stand up a memory backend (hosted or local), verifies it, and wires the connection into the AI agents you already use — showing you every change and backing up every file before it writes. No decision tree, no hand-edited config, no copy-pasting tokens between four terminals.
What the installer does
Section titled “What the installer does”graph LR
A["1 · Detect<br/>OS, Node, Docker,<br/>Git, agent roots"] --> B["2 · Choose<br/>Hosted, Local,<br/>or Existing"]
B --> C["3 · Provision<br/>Deploy + health-check<br/>your AutoMem server"]
C --> D["4 · Wire agents<br/>Review the plan,<br/>then connect Codex,<br/>Claude Code, Cursor…"]
It is safe to run, and safe to re-run:
- Nothing is written until you approve a plan. The installer prints a full review — endpoint, API key status, and every file it will touch — and waits for a yes.
- Every changed file keeps a
.bakcopy, so you can always roll back. - Re-running is idempotent. Local server tokens are reused (not rotated), so a second run never invalidates agents you already connected.
Prerequisites
Section titled “Prerequisites”| Tool | When it’s needed |
|---|---|
| Node.js 20.19+, 22.13+, or 24+ and npm | Always (the installer and the MCP bridge run on it) |
| Docker + Git | Only if you choose the Local Docker path |
The launcher checks for Node and npm first and stops with a clear message if either is missing — it never dumps a stack trace at you.
Walk-through: the installer, prompt by prompt
Section titled “Walk-through: the installer, prompt by prompt”Here is exactly what you’ll see, and what each choice means.
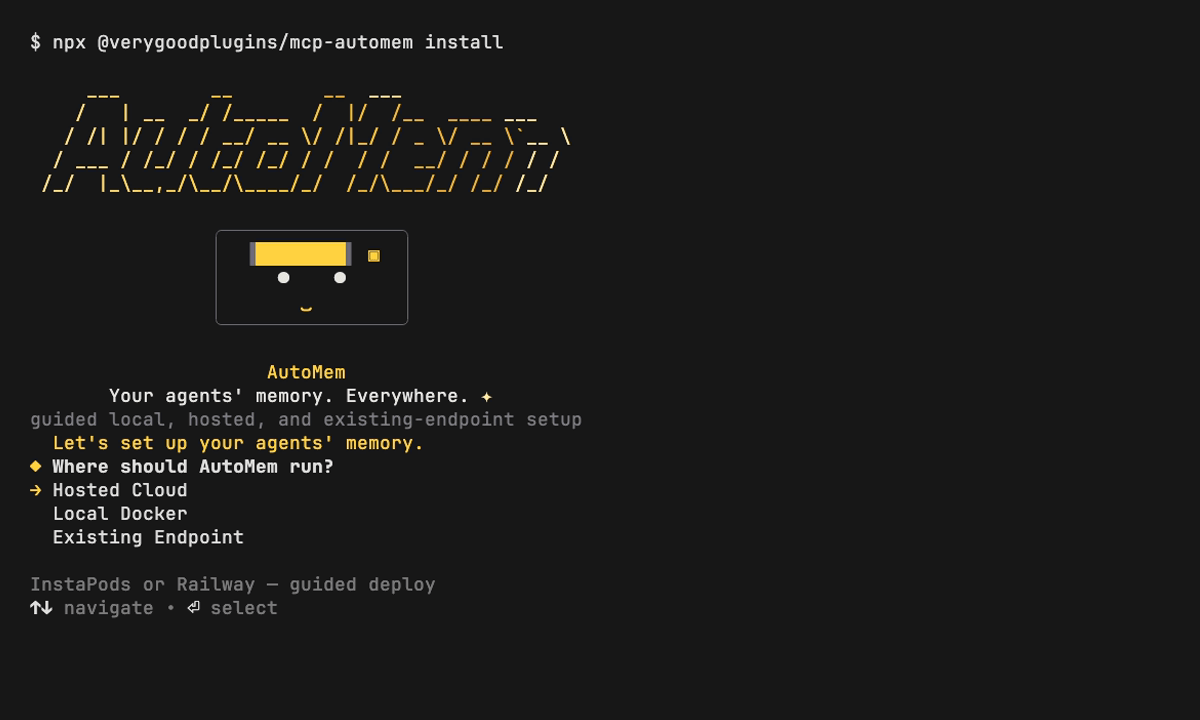
Splash → “Where should AutoMem run?”
Section titled “Splash → “Where should AutoMem run?””After a brief AutoMem splash, the first question picks your backend:
? Where should AutoMem run?❯ Hosted Cloud InstaPods or Railway — guided deploy Local Docker Clone AutoMem and start Docker Compose on this machine Existing Endpoint Use an AutoMem URL you already have| Option | Choose it when | What happens |
|---|---|---|
| Hosted Cloud (default) | You want always-on memory across devices and machines | The installer guides a cloud deploy and captures the endpoint + token for you |
| Local Docker | You want everything on your own machine, no cloud, no cost | Clones AutoMem into ~/.automem/server, generates local tokens, runs docker compose up, and waits for /health |
| Existing Endpoint | You already run AutoMem somewhere | Paste the URL (and key); the installer verifies it before touching any agent config |
Hosted Cloud → pick a provider
Section titled “Hosted Cloud → pick a provider”Choosing Hosted Cloud asks how to stand it up:
? How should we stand up your hosted AutoMem?❯ InstaPods open the setup page — it deploys AutoMem and emails your URL + key Railway (guided) sign in with the railway CLI, deploy from the terminal, then auto-capture keys Other — I already have a URL + key already deployed somewhere; just paste your endpoint + token- InstaPods — opens the InstaPods setup page (it deploys AutoMem and emails your API URL + key, Grow plan ~$15/mo flat), then you paste them back.
- Railway (guided) — signs in via the
railwayCLI and deploys the AutoMem template straight from the terminal (usage-based, ~$1–5/mo), auto-capturing the endpoint + token. Falls back to a browser deploy if the CLI can’t finish. - Other — you already have an endpoint; paste the URL + token and skip provisioning.
For Existing Endpoint (or Other), you’ll be prompted for the URL and a masked API key:
? AutoMem API URL › https://your-automem.example? AutoMem API key (leave blank if this endpoint does not require one) › ••••••••“Install AutoMem into which agents?”
Section titled ““Install AutoMem into which agents?””Next, choose which agents get wired up. Agents already detected on your machine are pre-checked — press space to toggle, enter to confirm:
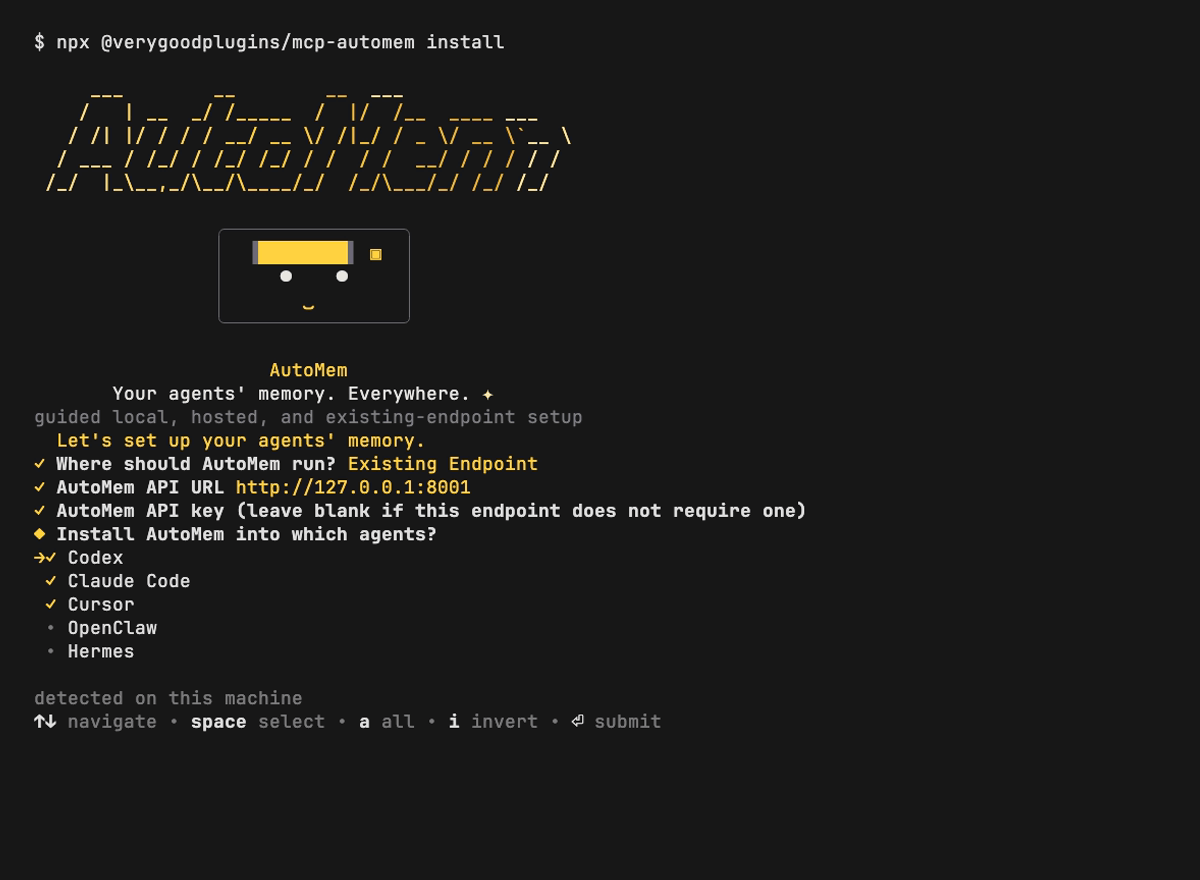
? Install AutoMem into which agents? (space to toggle, enter to confirm)❯ ◉ Codex detected on this machine ◉ Claude Code detected on this machine ◉ Cursor detected on this machine ◯ OpenClaw not detected, still installable ◯ Hermes not detected, still installable ◯ Grok not detected, still installableDetection looks for ~/.codex, ~/.claude, ~/.cursor, ~/.openclaw, ~/.hermes (override with $HERMES_HOME), and ~/.grok (override with $GROK_HOME). Anything not detected is still installable — just check it.
If you select Claude Code, it asks how to integrate:
? How should AutoMem integrate with Claude Code?❯ Plugin (recommended) bundles the MCP server + hooks, prompts for your endpoint, auto-updates Settings-level install writes ~/.claude hooks + permissions directly; no auto-update- Plugin (recommended) — adds the AutoMem marketplace and installs the plugin, which bundles the MCP server, hooks, and skill and auto-updates. If the
claudebinary is on your PATH the installer runsclaude plugin installfor you; otherwise it prints the two/plugincommands to run inside Claude Code. - Settings-level — writes
~/.claudehooks and permissions directly. Scriptable, but you update it yourself.
Selecting Hermes asks for a mode: Native memory provider (recommended — replaces Hermes’ built-in provider), MCP tools only (portable tools, no replacement), or Both.
Review the plan, then approve
Section titled “Review the plan, then approve”Before changing anything, the installer prints the full plan and waits for a yes:
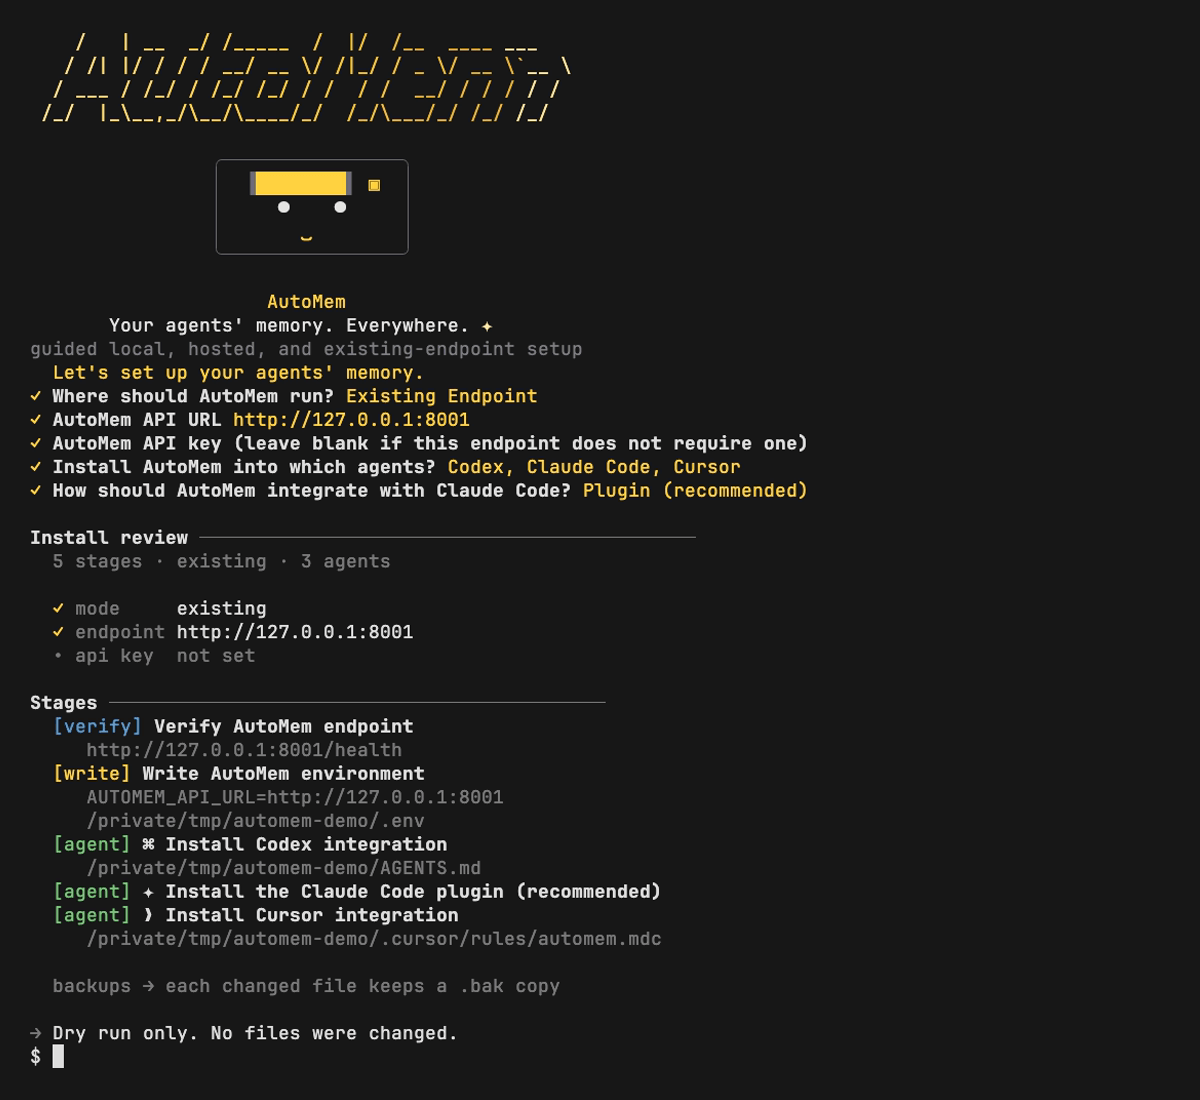
The plan lists the mode and endpoint, whether an API key is set (always shown redacted), and every stage it will run — verify the endpoint, write .env, and configure each agent — with the exact file paths it will touch. Every changed file keeps a .bak copy. (The screenshot above is a --dry-run, which prints the plan and stops without writing anything.)
Approve, and a live checklist ticks through each step — verify endpoint, write .env, configure each agent — finishing with a success card and your endpoint. If an individual agent needs a manual step (for example the OpenClaw CLI isn’t installed), that one is flagged with a copy-paste fix and the rest still complete.
Customize the install
Section titled “Customize the install”The installer is fully scriptable. Every prompt has a flag and an environment variable, so you can pre-answer some questions, automate the whole thing in CI, or preview a run without touching disk. Set environment variables before the pipe, or pass flags when calling the npm package directly.
# Hosted cloud, fully interactive (default)curl -fsSL get.automem.ai | sh
# Local Docker, no questions askedcurl -fsSL get.automem.ai | AUTOMEM_INSTALL_TARGET=local AUTOMEM_YES=1 sh
# Point at an endpoint you already run, only wire Codex + Cursorcurl -fsSL get.automem.ai | \  AUTOMEM_INSTALL_TARGET=existing \  AUTOMEM_API_URL=https://memory.example \  AUTOMEM_API_KEY=sk-... \  AUTOMEM_CLIENTS=codex,cursor \  AUTOMEM_YES=1 sh
# Preview the plan without changing anythingcurl -fsSL get.automem.ai | AUTOMEM_DRY_RUN=1 sh
The equivalent flags work on the npm package: npx @verygoodplugins/mcp-automem install --target existing --endpoint https://memory.example --clients codex,cursor --yes.
| Flag | Environment variable | Purpose |
|---|---|---|
--target | AUTOMEM_INSTALL_TARGET | local, cloud, or existing |
--cloud-provider | AUTOMEM_CLOUD_PROVIDER | instapods, railway, or other |
--clients | AUTOMEM_CLIENTS | Comma-separated agents: codex,claude-code,cursor,openclaw,hermes,grok |
--endpoint | AUTOMEM_API_URL | AutoMem HTTP API endpoint |
--api-key | AUTOMEM_API_KEY | Bearer token for authenticated deployments |
--local-dir | AUTOMEM_LOCAL_DIR | Local backend checkout path (default ~/.automem/server) |
--claude-code-mode | AUTOMEM_CLAUDE_CODE_MODE | plugin (default) or settings |
--hermes-mode | AUTOMEM_HERMES_MODE | mcp (default), provider, or both |
--yes / -y | AUTOMEM_YES=1 | Apply the reviewed plan without prompting |
--dry-run | AUTOMEM_DRY_RUN=1 | Print the plan, write nothing |
--no-agent-install | AUTOMEM_NO_AGENT_INSTALL=1 | Set up the endpoint only; skip agents |
Verify it worked
Section titled “Verify it worked”Once the installer finishes, confirm the backend is healthy:
# Local Dockercurl http://localhost:8001/health
# Hosted / existing endpointcurl https://your-automem-url/health \  -H "Authorization: Bearer YOUR_AUTOMEM_API_TOKEN"
A healthy response looks like this:
{ "status": "healthy", "falkordb": "connected", "qdrant": "connected", "memory_count": 0, "enrichment": { "status": "running", "queue_depth": 0 }, "graph": "memories"}| Field | Description |
|---|---|
status | Overall health: "healthy" or "degraded" |
falkordb | Graph store connection: "connected" or "disconnected" |
qdrant | Vector store connection: "connected" or "disconnected" |
memory_count | Total memories in the graph |
enrichment.status | Background worker state: "running" or "stopped" |
graph | FalkorDB graph name (default memories) |
Try it end to end
Section titled “Try it end to end”Restart the agent you connected (quit and reopen — don’t just close the window), then:
- Ask it to check AutoMem health — this calls the
check_database_healthtool. - Ask it to remember something: “Remember that I prefer TypeScript over JavaScript for new projects.”
- In a fresh chat, ask “What are my language preferences?” — the memory should come back, retrieved via hybrid search.
Manual & advanced setup
Section titled “Manual & advanced setup”Prefer to run the backend yourself, or wire an agent by hand? Everything the installer automates, you can also do manually.
Deploy the AutoMem server yourself
Section titled “Deploy the AutoMem server yourself”| Method | Setup time | Best for |
|---|---|---|
| InstaPods Hosted | ~30 seconds | Fastest hosted AutoMem, flat $15/mo, generated MCP config |
| Railway | ~60 seconds | Production, multi-device, HTTPS, usage-based billing |
| Docker Compose | ~5 minutes | Full local stack, no cloud cost |
| Bare-metal Python | ~2 minutes | An existing FalkorDB and direct debugging |
Docker Compose is the quickest manual local stack:
git clone https://github.com/verygoodplugins/automem.gitcd automemmake dev # docker compose up --buildServices start on :8001 (Flask API), :6379 (FalkorDB), and :6333 (Qdrant). See Docker & Local Dev for volumes, environment overrides, and the bare-metal Python path.
Connect an agent by hand
Section titled “Connect an agent by hand”The setup wizard prints config snippets for every platform, or use the lighter endpoint-only wizard if you just need to write a .env:
npx @verygoodplugins/mcp-automem setupFor a manual MCP entry — for example Claude Desktop’s claude_desktop_config.json:
{ "mcpServers": { "mcp-automem": { "command": "npx", "args": ["-y", "@verygoodplugins/mcp-automem"], "env": { "AUTOMEM_API_URL": "http://localhost:8001" } } }}Add "AUTOMEM_API_KEY": "your-token" for authenticated (hosted) endpoints. Per-platform paths and snippets live in the Platform Guides.
Authentication
Section titled “Authentication”AutoMem accepts a token three ways, in order of preference:
# 1. Bearer token (recommended)curl -H "Authorization: Bearer YOUR_TOKEN" http://localhost:8001/health
# 2. Custom headercurl -H "X-API-Key: YOUR_TOKEN" http://localhost:8001/health
# 3. Query parameter (discouraged — tokens land in logs)curl "http://localhost:8001/health?api_key=YOUR_TOKEN"
Admin operations need an extra header:
curl -H "Authorization: Bearer YOUR_TOKEN" \ -H "X-Admin-Token: YOUR_ADMIN_TOKEN" \ http://localhost:8001/admin/...Troubleshooting
Section titled “Troubleshooting”| Symptom | Likely cause | Fix |
|---|---|---|
node is required from the launcher | Node/npm not installed | Install Node 20.19+ (nvm install 20), then re-run |
Installer says the package has no install | Old npm cache | The guided installer ships in @verygoodplugins/mcp-automem 0.15.0+; clear the npx cache or pin @latest |
| Local server won’t start | Port in use (:8001, :6379, :6333) | Stop the conflicting container (docker ps) or free the port, then re-run |
503 Service Unavailable | FalkorDB unreachable | Check FALKORDB_HOST / FALKORDB_PORT |
"qdrant": "disconnected" | Qdrant not configured | Expected — set QDRANT_URL to enable vector search |
401 Unauthorized | Wrong/missing token | Verify AUTOMEM_API_KEY; provide it without a Bearer prefix |
ECONNREFUSED on Railway | A platform set a non-8001 PORT while callers use :8001 | Pin PORT=8001 on memory-service |
| Tools don’t appear in your agent | Client not reloaded | Fully quit and reopen the agent (don’t just close the window) |
| One agent flagged “needs a manual step” | That agent’s CLI was missing | Run the printed fix command; the rest of the install still succeeded |
Next steps
Section titled “Next steps”- Connect more platforms — Platform Guides for Claude Desktop, Claude Code, Cursor, Codex, and remote MCP.
- Configuration reference — Environment Variables and Configuration for every setting and embedding provider.
- Use memory well — Memory Operations for tagging, importance, recall, and relationships.
- Production hardening — Railway and Docker for monitoring, backups, and scaling.